The Red Heart: granny all in one square yarn claims: "No color switchin'. Keep on stitchin'." Naturally I was a tad hesitant of this and I wanted to test out if this is true. In this review I will share my initial thoughts on this new product, my concerns, and how it turned out. After much deliberation I chose the skein whose color way is soft white - amethyst. From the inside to the outside of the 5 round granny square the colors are: a dark purple, a light purple, a medium blue, a medium purple, and white.
Initial Thoughts and Concerns
The first time I saw this yarn I was intrigued, but did not buy it immediately. However, I thought that it could be an interesting experiment as well as make a good review. I was really excited at this advancement in crochet yarn technology, although I was a bit skeptical as well. I have never seen anything like this before, a yarn to make a granny square without any color changes. Something I have not done very often is make a regular granny square, I tend to make a solid granny square, although this is not very often. I enjoy saving time and despise weaving in ends, so if this works I would love that.
I have not yet tried this out, but I am unsure if this will work. There are a few reasons for my skepticism. The first being that peoples tensions could be different throwing off the color changes so the desired affect is not achieved. The second is that if it can successfully make a granny square, following their instructions and with the recommended hook size (5.5 mm crochet hook), if the advertised color change is achieved time and time again.
I want to test this yarn out to see if it does as advertised which is to make granny squares without having to use different skeins of yarn for the color changes. Finally, I want to see if it makes all 14 granny squares. Mostly I am just excited to see if it turns out and works as intended.
Granny Squares
At this point I will show you all of the granny squares that I made using a single skein of Granny Square Red Heart yarn, how they turned out, and any issues that happened with the color changes.
Please note that the granny squares are not blocked, which is why they are not laying perfectly flat and the corners are curling up. I also did not weave in the ends so you could see the amount of white yarn left over, some granny squares had plenty of white yarn left over and others had the tail starting with the dark purple center, taking away from the next granny square.
The first 2 color changes went smoothly and at the correct times. However, the color change between rounds 3 and 4 happened after my chain up of 6 to start the round. An interesting thing happened for round 5 in which a color change happened too late and too early. The purple from round 4 was there for 4 of the 6 chains at the beginning of the round. At the end of the same round the last 2 double crochets were the same shade of purple at the center of the granny square.
With this granny square the first and fifth rounds were the most problematic. You can see it in the picture, but the light purple was present in the last 2 double crochets of the first round. In the last round the medium purple from the fourth round is apparent in the chain up of 6 and the first double crochet. The previous rounds color also carried over into the beginning of round 4.
There were no major errors with the color changes in this granny square. There were a couple of times when the colors from the previous row carried over into the chain up of the next row, but the color changes were pretty clean and it created a granny square with mostly unnoticeable color changes.The chain up of 6, especially in rounds 3, 4, and 5 have the color carry over from the previous round. I would still call this granny square overall a success, with any errors in the color changes, while being noticeable, are not super major.
This granny square is virtually flawless in terms of the color changes. Being very picky, the color changes going into rounds 4 and 5 had the color from the previous round carry into the beginning chain up of 6. Other than this the granny square turned out quite well.
With no overtly obvious errors at the time the colors change between the rounds. The color from the previous round did carry over into rounds 3 and 4, but the colors are similar enough that it is less obvious in some of the other granny squares.
Even though any errors in the color changes were mainly the same as granny square 6 (with the color from the previous round mainly carrying into rounds 3 and 4). There is the addition of the very beginning of the chain up of 6 in rounds 2 and 5 including the previous color. Since this is also part of the granny square, this makes all of the minor color changing errors seem larger and more noticeable in the finished product as a whole.
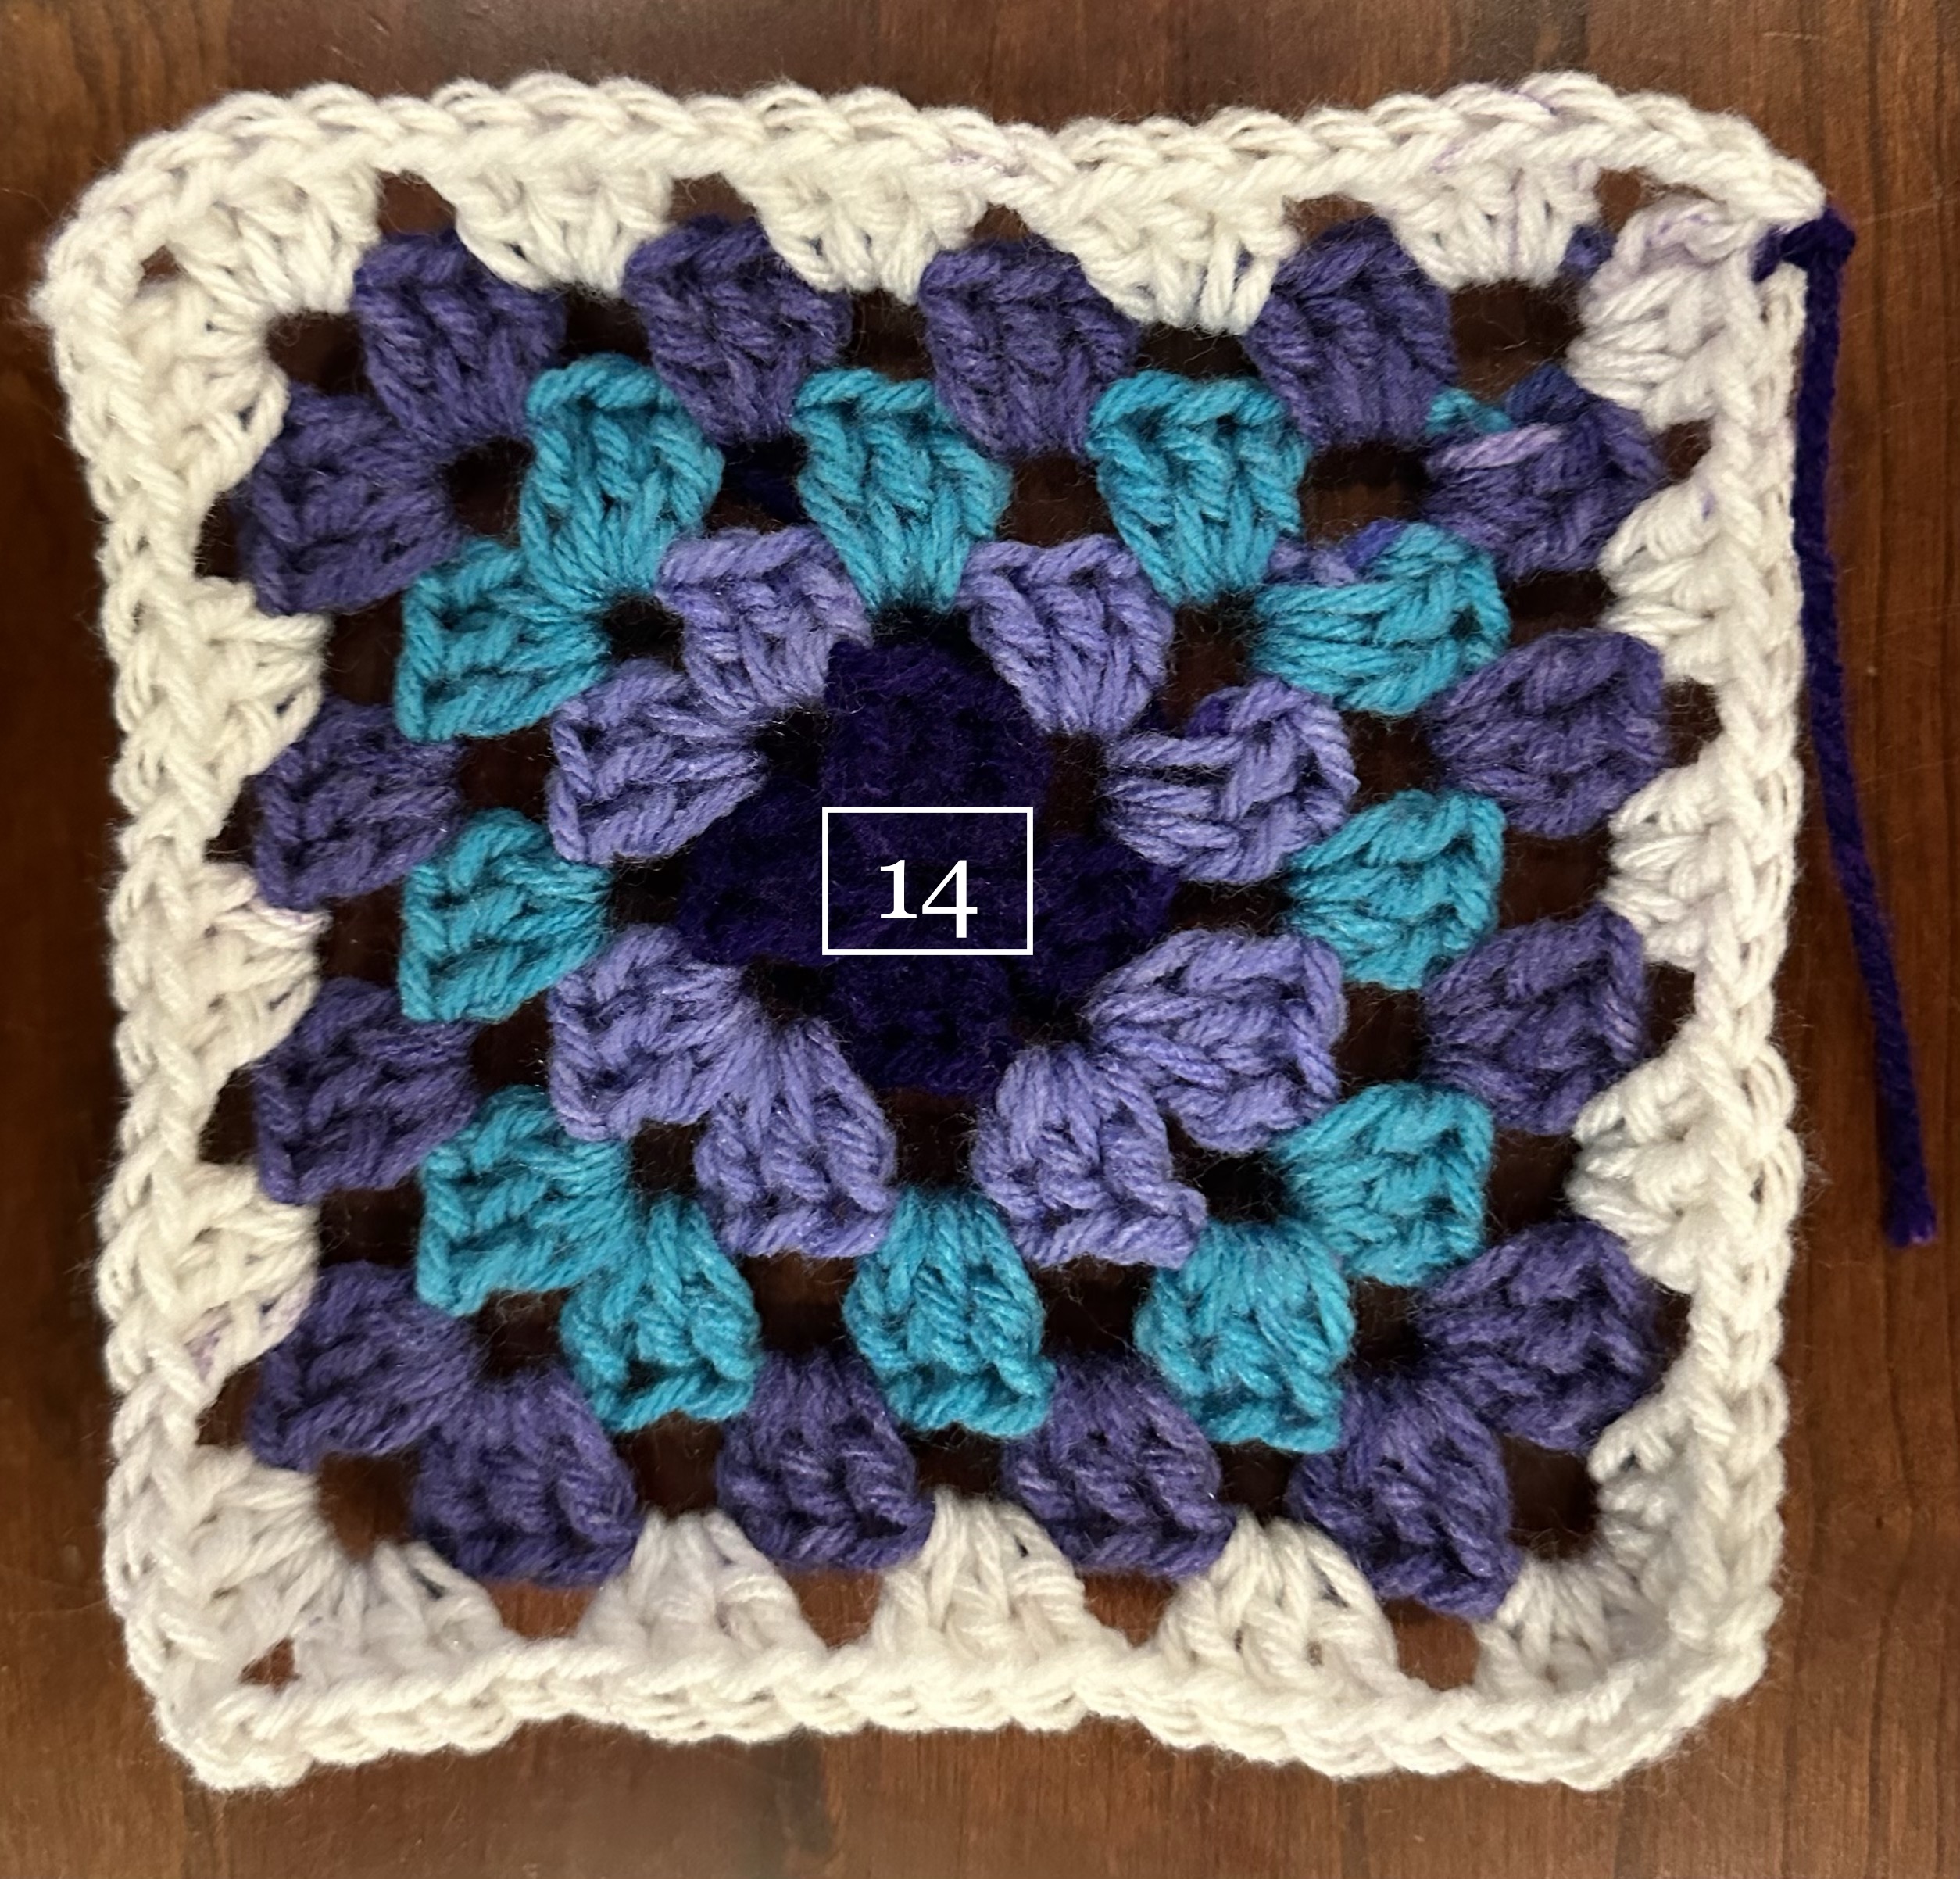
The chain up of 6 at the beginning of round 2 includes the previous color. However, both the chain up of 6 and at least half of the first double crochet includes the color of the previous round in rounds 3 and 4. The chain up of 6 in round 5 includes the previous color as well. I would still call this granny square a success, I am just being incredibly nit picky just in case this matters to anyone looking to purchase this yarn.
This granny square had the main problems of most of the other granny squares. This being that the color of the previous round was carried over into the chain up of 6 of the next round. In this granny square this could mainly be seen in round 3, and a little bit in round 2. Other than these minor errors this granny square is almost perfect in terms of the color changes.
Looking at the color changes there really was only one color change error and that was when the color of round 2 was carried into the beginning chain up of 6 in round 3. Other than this singular problem with the color changes the rest of them all happened at the intended times.
At the beginning of the blue or third round you can see the light purple from round 2 in the chain up. This is a fairly minor error in the color changes.
There are virtually no color changing errors in this granny square. Any "issues" with this one are so minor that they are hardly noticeable unless one looks closely.
You can see the color from row 1 seeping into the beginning of row 2. The following row row 2 going into the beginning of row 3.
This was the final granny square, I would say that this one had some of the fewest errors in terms of the color changes in my opinion. At this point in the process I think that I had figured out the changes that I needed to make the tension in order for the color changes to work. This is more or less the culmination of what I have learned from all of the previous granny squares.
Summary
Each granny square made is approx. 6" by 6", so the yarn label gave correct sizing expectations for each granny square. On the whole I would give this yarn a 4.75/5, with a definite recommendation. It is definitely easier to make a multi colored granny square and there are much fewer ends to weave in at the end. The claims that this yarn made were mostly true, no outside yarns were needed to be brought in to make a 5 colored granny square. I liked the way that the yarn felt and it was easy to work with, somewhat soft and moved easily with my crochet hook.
Any "problems" or "issues" with the color changes in this granny square yarn could definitely be user error, I tried to make adjustments each row with my tension, going back and making some of my stitches looser or tighter if I got to the end of the round and the color change was happening too early or too late. This did not always fix the issue, as you can see in the pictures of my granny squares, but it helped quite a bit.
One of the things that I was not a fan of with this yarn is that there are not written instructions on the yarn label for how to make a granny square. They have a chart that depicts a granny square pattern solely through symbols. This is not a super easy skill and may be frustrating for beginners. While it is easy to find instructions for a granny square using the internet, I would be concerned that using a different pattern for a granny square could affect the out come of the granny square and make the color changes happen at unintended times.
After using up the whole skein of yarn in a total of 14 granny squares, although there was enough yarn left to make a 15th granny square. I would call all of these granny squares a success, granny squares 1 and 2 have the most color change errors, but these were my first two attempts with this yarn so more errors are not surprising.

 Next, I made Chunky Beanie by NatHipKnits. This was also a free download. The hat is dense, which will keep your ears quite warm in cold weather. I am not quite as happy with how the hat looked at the end, but I did use solid black yarn and I did not add a pompom on top, whereas the example pattern is with a variegated yarn and a pom pom. I am not a huge fan of the point at the top of the hat from the way it was decreased, but it looks fine on a head. This was also an easy pattern to follow, starting with a 2x2 rib, then knitting every round, and then alternating rows of decrease stitches and rows of all knit stitches. I give this pattern a rating of 3/5.
 Then, I made Chunky Monkey Beanie by Suzee Knits. This also made a super cute hat that I am really happy with. A free download and easy to follow pattern has made this a breeze. It does use both 8mm and 9mm circular needles. Beginning with a 1x1 rib, then a simple mock rib pattern, and then decreasing with both knit stitches together and purl stitches together. I think the hat I made is really cute, but a little bit on the big side, though not unwearable. This is most likely due to the yarn that I used, if I use this pattern again I would probably use a size 5 bulky yarn instead of a size 6 super bulky yarn. Or I might cast on fewer stitches if I use the same yarn. I give this pattern a rating of 4/5.