Wednesday, March 6, 2024

How To: Start at the Center

Uses

There are a few reasons or uses that you would want to start at the center of a project or crochet piece.  Examples of this include: granny squares, circles (either for something like a coaster or the beginning of a three dimensional shape such as an amigurumi).

Magic Ring or Magic Loop Method

To put it simply you wrap the yarn around your fingers a couple of times and then pull a loop of yarn through, chain up and then put your stitches into the center of the ring that you have created.  Once all of your stitches are pu into the ring you can pull the tail to tighten it.  

Pro: This method allows you to pull the center closed as tightly as you want it.

Con: This method does mean that you have to knot the tail from your magic ring before you weave in the end.  This method can be difficult because if it is not done correctly the center will not pull closed and it is a little harder with this method to do it correctly.


Chain 4 Method

In simplest terms you chain 4 and slip stitch into your first ch.  This creates a ring, you do your chain up after the slip stitch, do not cut off the yarn.  Once you have done your desired number of chains you put all of your stitches into the middle of the ring created by your chain 4.

Pro: You can weave in the center end without having to tie an extra knot.

Con: This method does not allow you to pull the center ring closed as easily.  If you will want this you would need to leave a longer tail before starting your chain 4 which will allow you to weave it through the base of all of your stitches into your chain 4 ring before pulling it tight, this also means that you would have to tie a knot to keep it this tight before weaving in the end.  Also, the first few times that I tried this method I had a hard time figuring out what was the center of the slip stitched ring.


Chain Method

This method is somewhat similar to the method above, but not identical.  To begin you are going to do the chain for the height of your stitch + 1.  If you wanted to make the center fo your project out of single crochet stitches you would do your chain up of 1 for the height of your stitch +1 meaning you would ch 2 to begin.  If you wanted to have the center of your project start out with double crochet stitches you would end up with a chain of 4, the 3 chains for the height of your first double crochet and then that additional chain.

Once this chain has been made you are going to put your desired number of stitches all into the first chain that you made (the chain closes to the tail/farthest from your crochet hook).

Pro: Easier to find where to put your stitches into as it is all just into a single chain space.  Also, has a slightly tighter center than the chain 4 method.

Con: While still plenty sturdy, to me to use this method feels less strong than the chain 4 method or the magic ring method.


When to Use

How to know when you should use which method.  The chain method is mainly used for bulky or super bulky weight yarns where the chain 4 method would be nearly impossible to execute due to the bulkiness of the yarn.

The magic ring method can be used on any type of yarn, bulky or not, but with chenille type/fuzzier yarns this method can strip off the fuzzy part making this method slightly more difficult to use.  However, this problem can be solved by using a thinner type of yarn just for forming the magic ring and then doing your chain up and all of your center stitches with your desired yarn.  however, if this sounds too complicated then you might want to avoid trying this when first starting to use bulky yarns.

I would not recommend using the chain 4 method for bulkier type yarns because seeing the stitches and the center of the chain 4 would get more difficult making it harder to execute.

In the end it really does come down to personal preference and comfortability with each of these types of starting center methods.  It can come down to the type of yarn that you are using for your project.  Some of this will be a bit of trial and error before you have one method that you favor over the others or for them to be executed without much difficulty.

Wednesday, February 28, 2024

February Pattern Review

Butterfly Top


The first pattern I followed, at the very beginning of the month.  This is an idea that has been on my crochet list for a while after seeing it all over Pinterest.  Finally decided that it was time to actually make this, I found a pattern on Mae Crochets site called FREE PATTERN: Crochet Butterfly Top.  To make this top I used Caron Cotton Cakes in the color way of Peach Blossom.  An easy pattern to follow, and it can be made to fit different body types by adding more rows in certain areas.  For me, this butterfly top came out beautifully, however this top sadly is not ideal for my body shape.  If I were to follow this pattern again for myself I might add more rows in some areas to add more coverage and simultaneously make it fit better.  Overall I would rate this pattern a 3/5.

Kanata Kerchief Tank

This was a deceivingly simple pattern.  It started with making 4 identical squares, attaching them together, adding straps, and cleaning up the edges.  I got this pattern as a free download from Ravelry as Kanata Kerchief Tank by Jennifer Ozses.  I used Caron Cotton Cakes in the color way of Peach Blossom, the same yarn that I used for the butterfly top.  This pattern is something that I would not suggest for beginners, especially if joining two pieces of crochet is something more challenging, or identifying your stitches is hard.  It created a nice flowy tank top that is fun to twirl in.  I would give this pattern a 3.5/5.

Corset


I found this pattern on YouTube a while ago.  It is called crochet corset tutorial by Ann Bui.  I used the Made With Love The Cottony One yarn made in partnership with Lion Brand and Tom Daley in the shades Indigo For It and Silver Medal.  It is an easy pattern to follow along with the tutorial.  There are a few negatives to this pattern for me, I have made this pattern a few times and it has never fit quite as desired (some of this might be me being extra picky).  Also, while it is easy to put all of the pieces together, you still have to make 6 separate pieces before joining them together.  I personally like to make things in as few pieces as possible so that there is the least amount of seaming together.  Do not let this deter you from trying this pattern if you want to try out a crochet corset.  Some of this is me, my clothing preferences, and my body shape.  I would also give this pattern a 3/5.


Wednesday, February 21, 2024

Cut Out Halter Top


This pattern can also be purchased on my Etsy linked here.

Notes

This is a one size top, but do not fret,  I will tell you along the way how you can adjust the pattern in order to fit your body better.

In the materials I have listed approx. how much yarn I used to make this top for me, but you may end up using less or more yarn.  Also, you do not have to use this specific yarn, but I would recommend you choose a weight 4 yarn.

Materials

  • 4.5 mm crochet hook
  • Made with Love the cottony one yarn, approx. 1.5 skein/278 yards (I used the shade Silver Medal)
  • Stitch Markers
  • Scissors
  • Yarn needle
  • Sew-on Snaps (2 sets) - These are the snaps that I used, I got them from Michael's
    • Needle and thread

Stitches

ch - chain

sc - single crochet

scblo - single crochet in the back loop only

sc2tog - single crochet 2 stitches together

hdc - half double crochet

2hdc - 2 half double crochets into the same stitch (an increase)

hdc2tog - half double crochet 2 stitches together (a decrease)

Neckline

Row 1: Ch 5, sc in the 2nd chain from your hook and the remaining 3 chain spaces (4).

Row 2: Ch 1 and turn, scblo in each and every space (4).

Repeat row 2 until you have completed row 46.  (Or until it fits comfortably around your neck, stretching it a little is okay, I would recommend not making it too loose).  Ch 1, pull up, and cut.

Wednesday, February 14, 2024

Review: The Cottony One

Somewhat recently I have discovered Tom Daley's yarn made in partnership with Lion Brand, called the Made With Love The Cottony One yarn.

In the color Silver Medal

This yarn is made out of a combination of cotton and acrylic, 60% and 40% respectively.  A skein of Made With Love The Cottony One comes as a 100g ball equalling 185 yards of yarn.  With 12 different shades: Lychee White, Over the Moon, Indigo For It, Red Red Wine, Marvellous Mushroom, Hot Cocoa, Olive Twist, Primrose Hill, Silver Medal, Pewter Pan, Gold Medal, and Flaming Amber.  Many of these colors are in the more neutral category, I like the majority of the colors, of course much of this is my personal preference.

I found this yarn so easy to work with.  The way that the yarn is twisted was easy for my crochet hook to use, some yarns split causing my crochet hook to frequently snag on 

Lion Brand is a company whose yarn I use regularly.  I have used and enjoyed their: Bundle of Love, Pound of Love, and Wool-Ease, both the original and Thick & Quick.  All of these yarns have been pleasant to work with and quite soft.

I had been meaning to try out Lion Brand's yarn with Tom Daley for a while before I came across it in Michael's one day and decided to give it a try and instantly fell in love.  Being so easy to work with, quite soft, and creates a sturdy fabric.

Since then I have bought probably 9 or 10 skeins of this.  In the shades: Indigo For It, Red Red Wine, Silver Medal, and Primrose Hill.

Wednesday, February 7, 2024

Crochet Vocabulary and Abbreviations

Vocabulary

Insert hook - to insert your hook into the desired stitch, unless specified otherwise this is through both loops

Yarn Over - to wrap the yarn around your hook, generally once unless specified otherwise

Pull Through - generally to pull back through the stitch that you inserted your hook into, tends to be immediately after a yarn over

Pull Through 2 - also follows a yarn over, not including the yarn over you pull through the next two loops on your hook

Pull Through All - preceded by a yarn over as well, to pull through all other loops on the hook, leaving a single loop left (from the yarn over), usually to finish a stitch


Crochet Abbreviations

This is especially important when it comes to reading patterns, normally these abbreviations are shown before the written pattern, but it is still useful to know and to become more familiar with them.

ch- chain

sc - single crochet

hdc - half double crochet

dc - double crochet

blo - back loop only (to crochet only into the loop of the stitch that is farthest from you rather than both)

inc - increase (to crochet two stitches in the same stitch)

dec - decrease (to crochet two stitches together)


Other

Often in patterns you will see a number followed by stitch type.  For example 2 dc.  The reverse can also be true where you see stitch type followed by a number, for example dc 2.

These DO NOT mean the same thing.

If a pattern uses a different system they will say that usually in the notes or abbreviation section before the main part of the pattern.

When it comes to the first type, e.g. 3 dc, this means that you put a single double crochet (dc) into each of the next 3 stitches.

The second type, e.g. 3 dc, means that you are supposed to put three double crochets all into the same stitch.

Wednesday, January 31, 2024

January Pattern Reviews

Knit Hats

I have been experimenting more with knitting hats.  I have tried out 3 different patterns thus far, all have used 8.00mm 16” circular knitting needles, as well as 8.00mm double pointed needles.  All of these patterns I found on Ravelry and I got all of them as free downloads.  All of these patterns were easy to follow and with the use of bulky yarn they worked up quickly. The hats I made from the Chunky Beanie and Chunky Monkey Beanie patterns I will be donating to a hats for the homeless charity in Minnesota.  When I make hats for donation I like to use black wool ease thick & quick lion brand yarn.


First, I made
Hat : Unity by Brome Fields.  I love the way the resulting hat looks, it is super cute and turned out amazing.  I started and finished this project in one evening, so it worked up fast, the pattern was easy to follow through a free pdf download.  If you know how to knit in the round, can knit and purl stitches, and decrease stitches then this is a pattern you can follow. Made with a 3x2 rib, then alternating 2 rows of knit stitches and 2 rows of 1 knit and 2 purl stitches, it fits me perfectly and I love the domed look the decreases give this hat. I give this pattern a rating of 5/5.


Next, I made Chunky Beanie by NatHipKnits. This was also a free download.  The hat is dense, which will keep your ears quite warm in cold weather.  I am not quite as happy with how the hat looked at the end, but I did use solid black yarn and I did not add a pompom on top, whereas the example pattern is with a variegated yarn and a pom pom.  I am not a huge fan of the point at the top of the hat from the way it was decreased, but it looks fine on a head. This was also an easy pattern to follow, starting with a 2x2 rib, then knitting every round, and then alternating rows of decrease stitches and rows of all knit stitches. I give this pattern a rating of 3/5.

Then, I made Chunky Monkey Beanie by Suzee Knits.  This also made a super cute hat that I am really happy with.  A free download and easy to follow pattern has made this a breeze.  It does use both 8mm and 9mm circular needles.  Beginning with a 1x1 rib, then a simple mock rib pattern, and then decreasing with both knit stitches together and purl stitches together. I think the hat I made is really cute, but a little bit on the big side, though not unwearable. This is most likely due to the yarn that I used, if I use this pattern again I would probably use a size 5 bulky yarn instead of a size 6 super bulky yarn. Or I might cast on fewer stitches if I use the same yarn. I give this pattern a rating of 4/5.


Later on I made: Landon by Ahleybah, this is a free downloadable pdf pattern on Ravelry. For this hat I used the yarn wool ease worsted weight yarn in the color black. This pattern called for size 4.5mm circular or double pointed needles. It has an 8 row repeat for the main body of the hat, it worked up easily, although with the use of smaller needles and thicker yarn it took me a bit longer than the other hats I made with super bulky yarn and thicker needles. This hat did turn out on the larger side, but as the pattern notes "It's the perfect simple hat suitable for guys with big heads and cold ears!" I am planning to donate this hat and am sure that it will fit someone nicely. I give this pattern a rating of 4/5.

Wednesday, January 24, 2024

Granny Square Red Heart Yarn

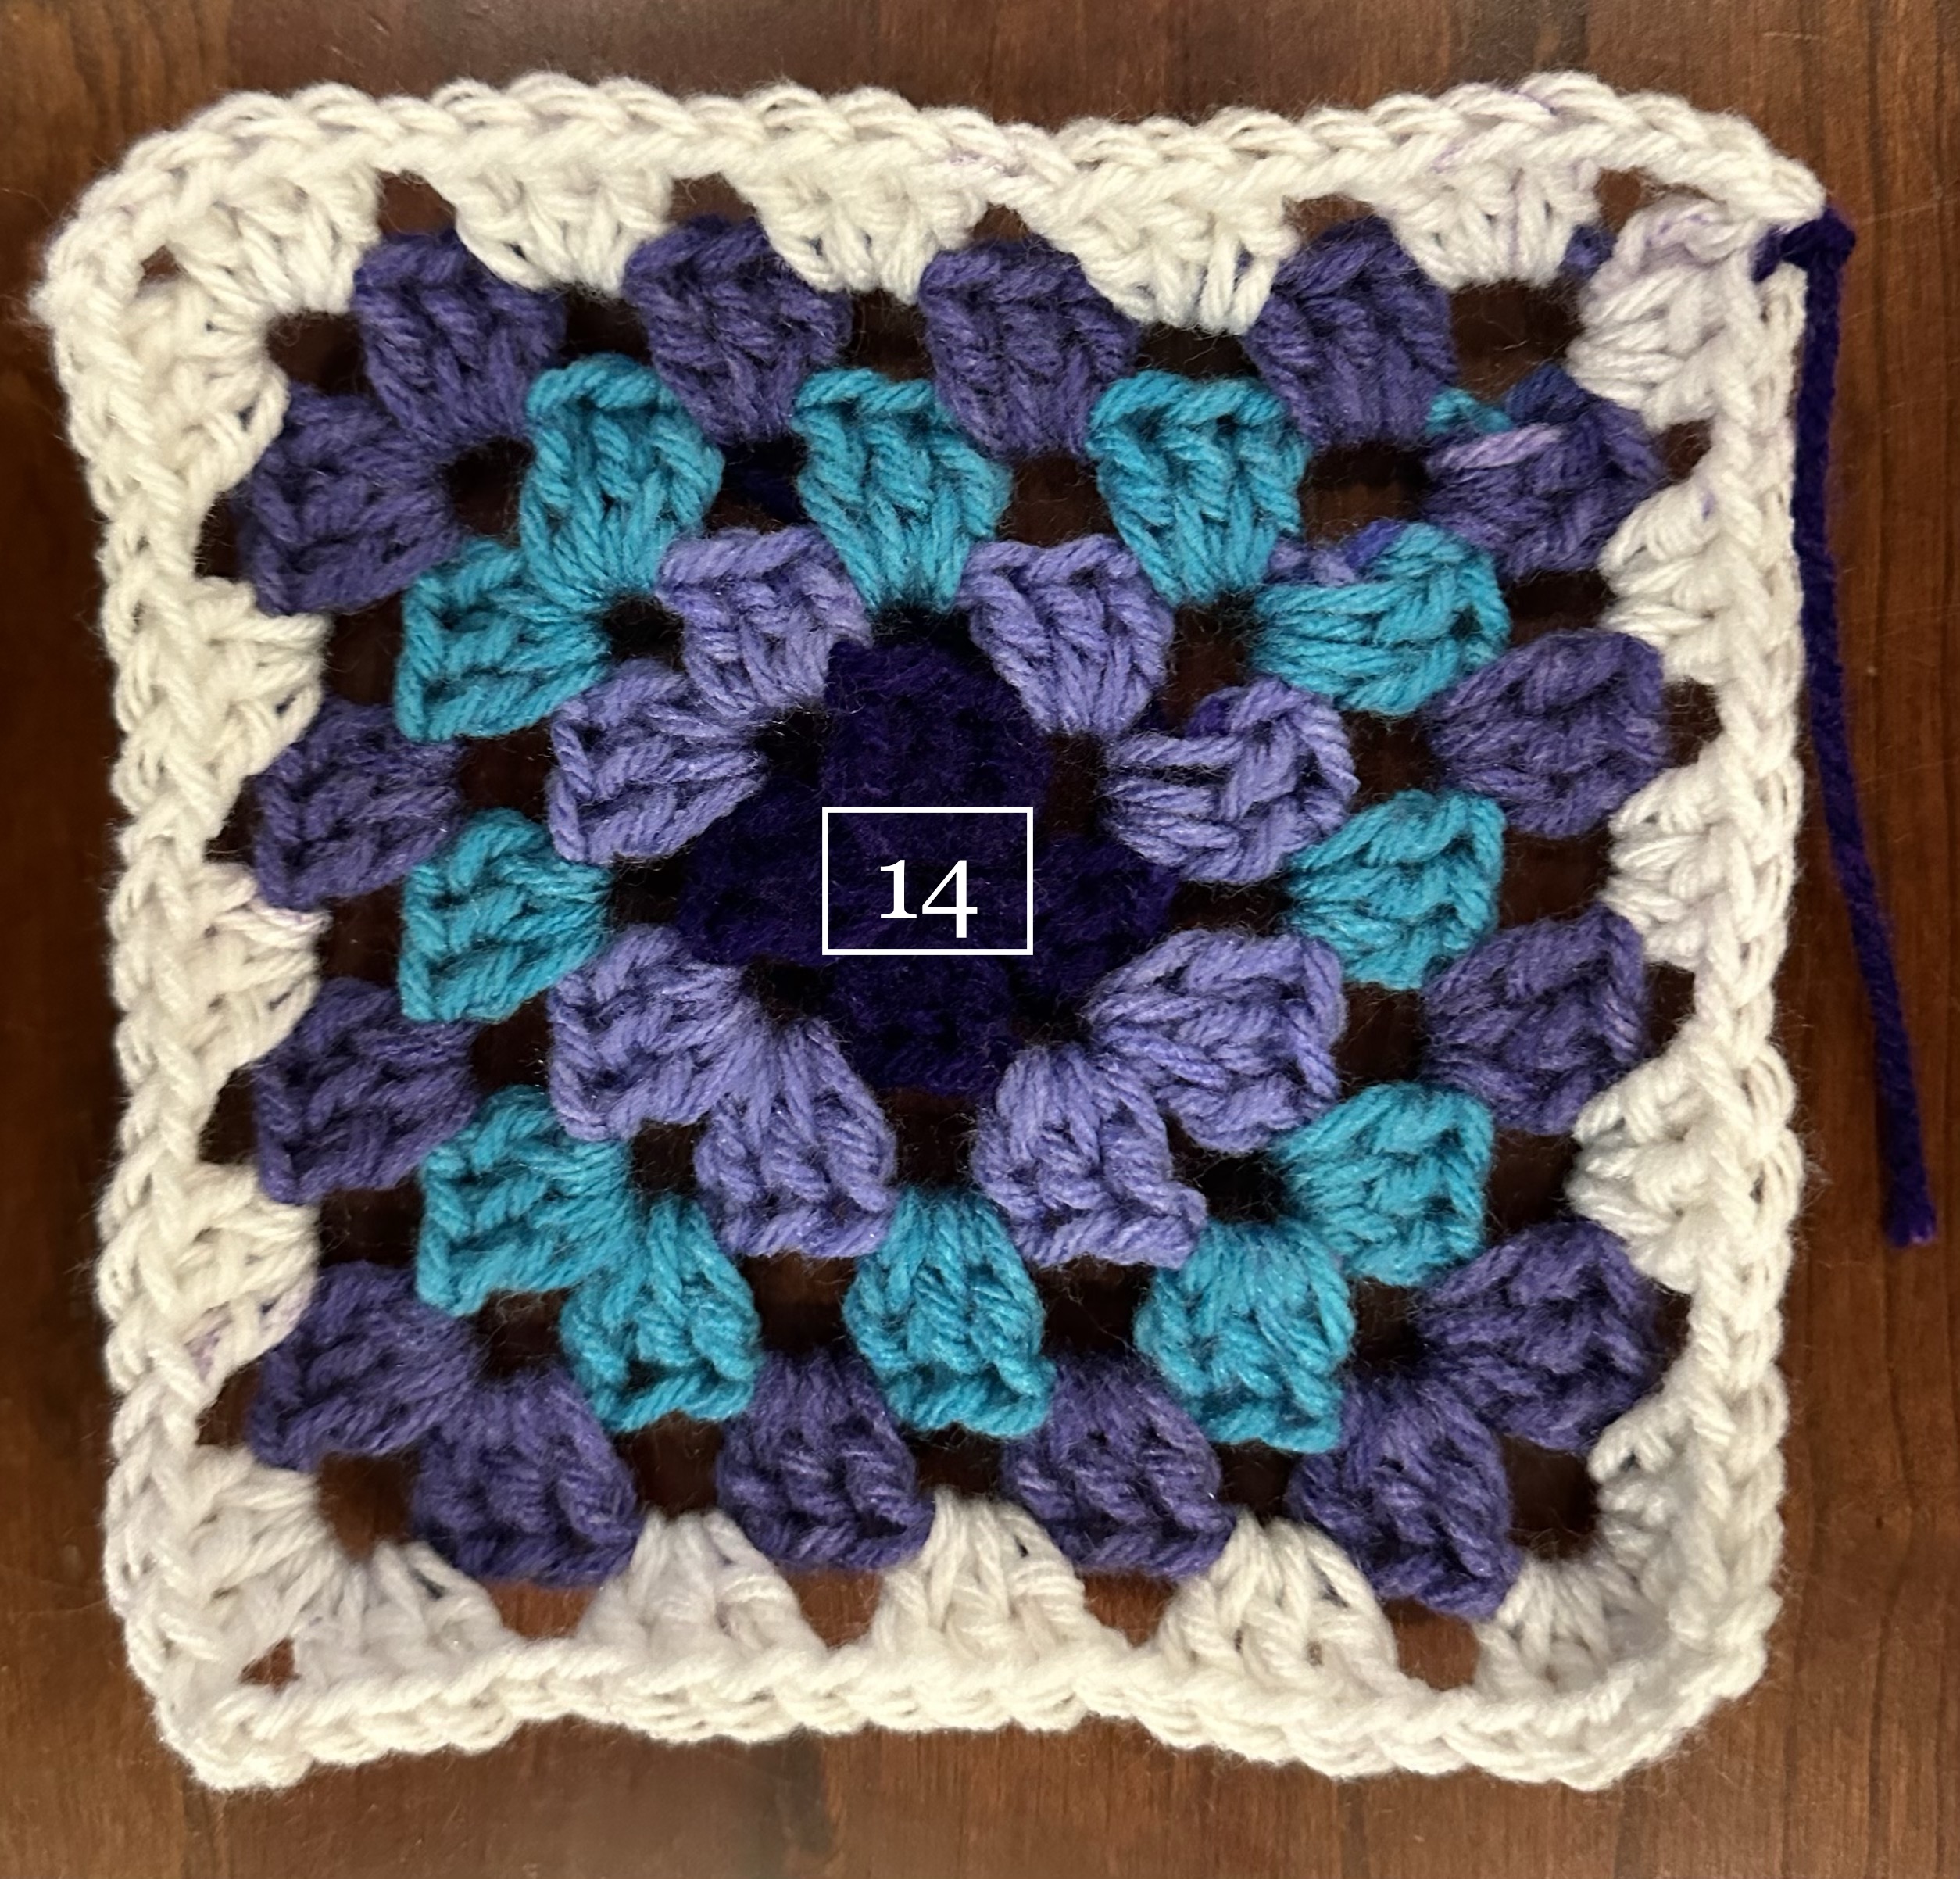
The Red Heart: granny all in one square yarn claims: "No color switchin'. Keep on stitchin'."  Naturally I was a tad hesitant of this and I wanted to test out if this is true.  In this review I will share my initial thoughts on this new product, my concerns, and how it turned out.  After much deliberation I chose the skein whose color way is soft white - amethyst.  From the inside to the outside of the 5 round granny square the colors are: a dark purple, a light purple, a medium blue, a medium purple, and white.

Initial Thoughts and Concerns

The first time I saw this yarn I was intrigued, but did not buy it immediately.  However, I thought that it could be an interesting experiment as well as make a good review.  I was really excited at this advancement in crochet yarn technology, although I was a bit skeptical as well.  I have never seen anything like this before, a yarn to make a granny square without any color changes.  Something I have not done very often is make a regular granny square, I tend to make a solid granny square, although this is not very often.  I enjoy saving time and despise weaving in ends, so if this works I would love that.

I have not yet tried this out, but I am unsure if this will work.  There are a few reasons for my skepticism.  The first being that peoples tensions could be different throwing off the color changes so the desired affect is not achieved.  The second is that if it can successfully make a granny square, following their instructions and with the recommended hook size (5.5 mm crochet hook), if the advertised color change is achieved time and time again.

I want to test this yarn out to see if it does as advertised which is to make granny squares without having to use different skeins of yarn for the color changes.  Finally, I want to see if it makes all 14 granny squares.  Mostly I am just excited to see if it turns out and works as intended.

Granny Squares

At this point I will show you all of the granny squares that I made using a single skein of Granny Square Red Heart yarn, how they turned out, and any issues that happened with the color changes.
 
Please note that the granny squares are not blocked, which is why they are not laying perfectly flat and the corners are curling up.  I also did not weave in the ends so you could see the amount of white yarn left over, some granny squares had plenty of white yarn left over and others had the tail starting with the dark purple center, taking away from the next granny square.

The first 2 color changes went smoothly and at the correct times.  However, the color change between rounds 3 and 4 happened after my chain up of 6 to start the round.  An interesting thing happened for round 5 in which a color change happened too late and too early.  The purple from round 4 was there for 4 of the 6 chains at the beginning of the round.  At the end of the same round the last 2 double crochets were the same shade of purple at the center of the granny square.

With this granny square the first and fifth rounds were the most problematic.  You can see it in the picture, but the light purple was present in the last 2 double crochets of the first round.  In the last round the medium purple from the fourth round is apparent in the chain up of 6 and the first double crochet.  The previous rounds color also carried over into the beginning of round 4.

There were no major errors with the color changes in this granny square.  There were a couple of times when the colors from the previous row carried over into the chain up of the next row, but the color changes were pretty clean and it created a granny square with mostly unnoticeable color changes.

The chain up of 6, especially in rounds 3, 4, and 5 have the color carry over from the previous round.  I would still call this granny square overall a success, with any errors in the color changes, while being noticeable, are not super major.

This granny square is virtually flawless in terms of the color changes.  Being very picky, the color changes going into rounds 4 and 5 had the color from the previous round carry into the beginning chain up of 6.  Other than this the granny square turned out quite well.

With no overtly obvious errors at the time the colors change between the rounds.  The color from the previous round did carry over into rounds 3 and 4, but the colors are similar enough that it is less obvious in some of the other granny squares.

Even though any errors in the color changes were mainly the same as granny square 6 (with the color from the previous round mainly carrying into rounds 3 and 4).  There is the addition of the very beginning of the chain up of 6 in rounds 2 and 5 including the previous color.  Since this is also part of the granny square, this makes all of the minor color changing errors seem larger and more noticeable in the finished product as a whole.

The chain up of 6 at the beginning of round 2 includes the previous color.  However, both the chain up of 6 and at least half of the first double crochet includes the color of the previous round in rounds 3 and 4.  The chain up of 6 in round 5 includes the previous color as well.  I would still call this granny square a success, I am just being incredibly nit picky just in case this matters to anyone looking to purchase this yarn.


This granny square had the main problems of most of the other granny squares.  This being that the color of the previous round was carried over into the chain up of 6 of the next round.  In this granny square this could mainly be seen in round 3, and a little bit in round 2.  Other than these minor errors this granny square is almost perfect in terms of the color changes.

Looking at the color changes there really was only one color change error and that was when the color of round 2 was carried into the beginning chain up of 6 in round 3.  Other than this singular problem with the color changes the rest of them all happened at the intended times.

At the beginning of the blue or third round you can see the light purple from round 2 in the chain up.  This is a fairly minor error in the color changes.


There are virtually no color changing errors in this granny square.  Any "issues" with this one are so minor that they are hardly noticeable unless one looks closely.

You can see the color from row 1 seeping into the beginning of row 2.  The following row row 2 going into the beginning of row 3.


This was the final granny square, I would say that this one had some of the fewest errors in terms of the color changes in my opinion.  At this point in the process I think that I had figured out the changes that I needed to make the tension in order for the color changes to work.  This is more or less the culmination of what I have learned from all of the previous granny squares.

Summary

Each granny square made is approx. 6" by 6", so the yarn label gave correct sizing expectations for each granny square.  On the whole I would give this yarn a 4.75/5, with a definite recommendation.  It is definitely easier to make a multi colored granny square and there are much fewer ends to weave in at the end.  The claims that this yarn made were mostly true, no outside yarns were needed to be brought in to make a 5 colored granny square.  I liked the way that the yarn felt and it was easy to work with, somewhat soft and moved easily with my crochet hook.

Any "problems" or "issues" with the color changes in this granny square yarn could definitely be user error, I tried to make adjustments each row with my tension, going back and making some of my stitches looser or tighter if I got to the end of the round and the color change was happening too early or too late.  This did not always fix the issue, as you can see in the pictures of my granny squares, but it helped quite a bit.

One of the things that I was not a fan of with this yarn is that there are not written instructions on the yarn label for how to make a granny square.  They have a chart that depicts a granny square pattern solely through symbols.  This is not a super easy skill and may be frustrating for beginners.  While it is easy to find instructions for a granny square using the internet, I would be concerned that using a different pattern for a granny square could affect the out come of the granny square and make the color changes happen at unintended times.

After using up the whole skein of yarn in a total of 14 granny squares, although there was enough yarn left to make a 15th granny square.  I would call all of these granny squares a success, granny squares 1 and 2 have the most color change errors, but these were my first two attempts with this yarn so more errors are not surprising.

Wednesday, January 17, 2024

Crazy Wavy Tote Bag

This pattern can be purchased on my Etsy linked here.

Pattern Notes

The bottom of this tote bag is worked flat in rows back and forth.  After the bottom of the bag is worked, the pattern is worked in joined rounds without turning.

Gauge is not important for this project.

You can do the color changes any way that you like, but I hid all of my color changes on the inside of the bag and kept both color A and color B attached for the whole body of the bag.  

There is a chain up of 4 to start every other row during the side section of the bag. To make the next color of yarn ready to pick up, I flipped it over before each chain making sure that after I did the fourth chain the yarn would end on the inside of the bag, the video demonstrates this color change.


Color changes on the
inside of the bag


This tote bag pattern is split up into 3 different sections: the bottom of the tote bag, the sides of the tote bag, and the handles.


Wednesday, January 10, 2024

How To: Basic Crochet Stitches

This is a list of what I have determined to be the most important crochet stitches to learn when you are first starting on your crochet journey.  These stitches are: chain, single crochet, half double crochet, and double crochet.  For each stitch I have listed what the stitch is mainly used for, then I have instructions on each step to follow in order to complete the desired stitch.


Chain

To start almost any crochet project you make a foundation chain.  The first step to making a foundation chain is a slip knot.  While a slip knot is not a stitch, it is important, if you do not know how to make a slip knot, instructions are at the bottom of this post.


With a slip knot on your crochet hook, yarn over (wrap the yarn around your crochet hook, I personally prefer wrapping the yarn over my hook from right to left), then pull the slip knot over your crochet hook, this can be helped by using the tail (the yarn hanging off of your slip knot that will be woven in at the end.  You should end up with one strand of yarn around your hook.  Yarn over and pull the beginnings of your chain over the crochet hook.


Continue to repeat these steps of yarning over and pulling through until you get to the desired length of your chain which will depend on your project or the pattern that you are following.


Single Crochet

Can be used for ribbing, it’s the main stitch used in amigurumi, and many other things.  I would have to say that this is one of the more universal stitches, while still being very simple with only a few steps.


If you are beginning to use this stitch immediately after making your foundation chain, you will insert your hook into the second chain from your hook (so make your foundation chain one longer than you want your panel to be.  If you’re following this after your first row into the foundation chain you want to do a chain up of 1 and turn your work, and insert your hook into the first stitch closest to your chain.  So after you insert your hook into the desired stitch you wrap your yarn around the hook before pulling it through.  Then, yarn over again and pull through both loops on your hook.  You have completed your first single crochet! Continue this process of inserting your hook into the next stitch, yarn over and pull through, then yarn over and pull through 2.


Remember: you only do a chain up of 1 at the end of each row, before you turn your work and begin the next row.


Half Double Crochet

    Half double crochet stitches are mainly used to create a not quite as dense fabric as if you were to only use single crochet stitches, but without as much loose space and less lacey of a fabric than if you were to use a double crochet.


    Before you insert your hook into your desired stitch you want to yarn over, this is the main difference between a single crochet and a half double crochet, giving the stitch more height.  If you are beginning to use this stitch immediately after making your foundation chain, you will insert your hook into the second chain from your hook (so make your foundation chain one longer than you want your panel to be).  If you’re following this after your first row into the foundation chain you want to do a chain up of 1 and turn your work, and insert your hook into the first stitch closest to your chain.  A chain up of 1 before beginning half double crochets is my preference, some prefer using a chain up of 2 at the end of each row.  It is up to you whether you want to use a chain up of 1 or 2, it may depend on what project you’re doing if you decide to use a chain of 1 or 2.  If you are still in the beginning stages of your crochet journey you may make your stitches tight, if this is the case I would suggest a chain up of 2. 


    After you have done your yarn over and inserted it into your stitch you are going to yarn over again before pulling it back through your stitch.  At this point you should have 3 loops on your hook.  To finish off your half double crochet stitch you are going to yarn over again before pulling through all 3 loops on your hook.  Your half double crochet stitch is now completed!


Repeat this process in which you yarn over, insert your hook, yarn over again and pull through, then yarn over and pull through 3, until the end of your row and do your chain up of 1 or 2 before turning your work and continuing the next row.


Double Crochet

    Double crochet stitches allow you to work up a panel quickly and it creates a fabric that drapes nicely.  It is taller than a half double crochet stitch which contributes to it working up faster.  It is also the stitch used in granny squares which is a signature item for crochet, these will be covered in another post.


    Same as in making a half double crochet you will yarn over before you insert your hook into the desired stitch.  If you are starting to use this stitch immediately after making your foundation chain you will want to insert your hook into the third chain from your hook, so make your foundation chain 2 chains longer than you want your panel to be.  This is because of the height of the double crochet.  Similar to the half double crochet there is a personal preference component to the chain up amount, either 2 or 3 chains.  My personal preference is two chains.  The main reason for using 2 versus 3 chains has to do with your tension.  When people typically begin to crochet, they have a tighter tension, so making a chain up of 3 might be better if you are first starting out and have yet to figure out how to fix your tension.


    So after you have done your initial yarn over and inserted your hook into your desired stitch you are then going to yarn over again before pulling your hook through.  At this point you should have 3 loops on your hook.  Then you are going to yarn over and pull through the first 2 loops on your hook.  Leaving 2 stitches on your hook, finally to finish off your double crochet stitch you are going to yarn over and pull through the last 2 loops on your hook leaving 1 loop.  You have now completed a double crochet stitch!

    Continue this process of doing a yarn over, insert your hook, yarn over and pull through, yarn over pull through 2, and yarn over pull through 2, until you reach the end of your row before doing your chain up of 2 or 3 before you turn your work and continue your double crochet stitches into the next row.


How to Make a Slip Knot

Start your slip knot 4 or 5 inches above the end of your yarn tail, by leaving a slightly longer tail this gives you enough extra yarn to weave it into your stitches at the end to hide it.


You are going to fold your yarn into a loop, then with your thumb and index finger in the loop you are going to pinch and pull the yarn that is on the bottom side of the yarn tail that was on the bottom side of the loop through the loop.  Then you are going to insert your hook into the loop that you have now created and pull one of the yarn tails to tighten the loop snuggly onto your crochet hook.  You are now ready to begin your first crochet project!


Wednesday, December 20, 2023

Craft YouTubers

When starting out on your crochet or knitting journey, videos can be very helpful while you learn.  Videos from YouTube can also be used for entertainment.  Sometimes I will watch somebody crochet or m knit something while I crochet.  I love watching crafting videos, so I have come up with a list of some of my favorite crafting YouTubers.

TCDDIY

One of the YouTubers that I have used multiple patterns from and have loved them all is TCDDIY.  She has new tutorials that come out twice a week, on both Wednesday and Sunday.  Her videos take you through every step in the process to complete the pattern which can be very helpful for beginners.  TCDDIY’s channel has playlists sorted into different articles of clothing (such as shrugs, dresses, sweaters, pants, or tank tops), and patterns that include different stitches which can be helpful if you want to practice a unique stitch or want to make a pattern that includes a specific stitch (such as the alpine stitch, suzette stitch, star stitch, or cables).  Any possible garment you could ever want to make TCDDIY has probably made it on her channel.  I have followed her patterns for: the cable stitch sweater and cable stitch shorts, with a growing list of patterns of hers I want to make.  This list includes: single strap top, V neck tank top, and cable stitch bralette.


Chenda DIY

Similar to TCDDIY is Chenda DIY, about once a week she comes out with a new crochet pattern, mainly garment patterns, although she also has patterns for accessories, such as a bag, bandana, water bottle holder, and others.  There is definitely a pattern that you will like regardless of your style.  I fell in love with her channel when I came across her pattern for a puff sleeve top on Pinterest.  In the future I would like to make one of her patterns for a corset top.  All of her videos go through easy to follow step by step instructions, even a beginner should be able to successfully follow her patterns and have a good looking outcome.


Jenna Phipps

A YouTuber that I adore is Jenna Phipps, I watch her videos every week.  She has done everything on her channel from thrift flips, DIYs, crocheting, knitting, and sewing.  If you’re into all things crafty, or if one of these topics catches your eye, then you’re sure to love her channel.  Her style is colorful and unique, it’s always fun to check in every week and see what new creative project she has embarked on or something new she wants to try.  Something on her channel that I love is that for the past few years she has made a video showing 1 hour projects for Christmas gift ideas, both ideas for crochet and knit.  Every year I go back and rewatch all of her Christmas gift idea videos, linked is her 1 hour Christmas gift video from this year.


Retro Claude

If you’re into knitting as well as all things vintage, or just find vintage garments interesting then the YouTube channel RetroClaude is for you.  She loves knitting vintage patterns and is currently on a journey to declutter her yarn stash, which I have found entertaining and inspiring to watch.  Other things on her channel include reviews of some vintage knitting patterns some of which have an interesting construction or were surprising in some way.  maybe with the way it is constructed, how the pattern is written, or how it connects with modern day techniques.  While sewing is not something I write about, or do much of, RetroClaude also sews vintage garments and has vintage sewing patterns for the 1930s, 40s, 50s, and other time periods.  She also has multiple sewing tutorials to help you get started.

Wednesday, March 1, 2023

Patterns I Cannot Wait to Try

Looking for ideas for some patterns to try?


Below I have made a list of some patterns that I want to try in the somewhat near future.  Links will be provided as well as why I want to make these projects.  I came across all of these patterns on Pinterest and have fallen in love.


Crochet

    This cropped crochet cardigan is something that I have had on my list for a while.  It has both a cropped and a long version of this cardigan.  I want to make the cropped version of this cardigan.  I really liked the look of it with a herringbone double crochet as well as that it is worked up in one piece.  This means that there is less sewing at the end as well as I think the cut of the cardigan is flattering and is a product that I may actually wear and use.

    A pattern that is free, appears easy to follow, and with a product that looks cute is the whimsy head wrap, which I think of more as a tie headband.  I think that it is a pattern that will be a fun project, where I will like the outcome, without taking loads of time to finish.  Having my hair in my eyes is something I despise and is one of my greatest pet peeves, so this head wrap is something that could allow me to leave my hair down every once in a while without getting it in my eyes.

Knit

    I have been looking to take steps forward with my knitting skills.  This next step I hope to take is a knit pattern that I can wear.  I hope that this will be a tank top.  This is a pattern that is made for the summer, and while it is very much winter where I am now it is still on my list of things to make.

    On a very different note from this summery spring tank top is this knit dog sweater.  My mini golden doodle loves cozy snuggly things and making him a knit sweater would give me great joy if it is something that he enjoys.  It also seems like a pattern that I should be able to follow or fill in any gaps myself.  This is a video pattern from Jenna Phipps who I like watching on youtube, sometimes while I crochet or knit something different.  This is also a pattern that you can buy from hobbii (there is a link in the description of the video), but I plan to follow the video version to make this sweater.