Showing posts with label Individual Projects. Show all posts

Friday, February 10, 2023

Knit Arm Warmers

If crochet is not your thing and you still want warm arms, here is my pattern for knit arm warmers.

Materials

  • Size 10 or 6mm knitting needles
  • Medium weight 4 yarn (approx. 75m)
  • Scissors
  • Yarn needle

Other Information

    The yarn that I used for this project was the same as that of my Super Simple Crochet Arm Warmers.  It is called Dream and I chose a beautiful dark mauve shade.

    The number that I casted on was determined by the circumference of my wrist.  My crochet version of arm warmers was worked lengthwise to then fit around the wrist.  Whereas for this knit version I was working with the circumference of my wrist  to then reach length after enough rows were completed.

    The size/weight of yarn that you choose is not very important.  However, this will affect the size of knitting needles that you choose, the number you cast on, and how many rows you knit.  If you choose a thinner yarn you will most likely use smaller needles and need to cast on more stitches along with having to knit more rows overall.  The opposite would happen for each if you use thicker yarn.

    To be entirely honest you may have to work enough rows to be able to tell whether or not this will fit around your wrist.  In which case you would have to start over if it is too small or too big.  Remember that this pattern will make the arm warmers stretch quite a bit.

Instructions

Cast on: Make sure that you leave enough of a tail to stitch the part of the arm warmers from your knuckles to where you want your thumb hole to begin.  Then cast 28 stitches onto your knitting needles.  The weight of yarn or needle size does not matter as long as they are compatible.  I used a weight 4 yarn and size 10 or 6mm knitting needles.

To keep following the pattern make sure that it is in a multiple of 4.  I also used a really stretchy stitch so you would probably be more worried about the arm warmer being too big rather than too small.  You can see how stretchy this stitch is in the picture below.  At the top of the rectangle you can see how narrow the rectangle seems before it is stretched and at the bottom of the picture you can see how stretchy it is.

All rows: A 2x2 ribbing, which means 2 knit stitches then 2 purl stitches.  Repeat this for the entirety of the row.


Since this arm warmer was knit flat to achieve the ribbed look, you have to alternate what stitch is knit.  For the stitches that you knit in the previous row you will purl them, and those that you purled you will not knit those stitches.  If you followed my suggestion above and cast on a multiple of 4 you do not need to think about what stitch you made in the previous row.  Instead you will just start with 2 knit stitches for each row.

I repeated this rib stitch for a total of 43 rows.  This can really be for as many rows as you need to go from your knuckles until your desired length for the arm warmers is achieved.

Once you have reached your desired length you will cast off.  The way that you cast off is not important to the result of the arm warmer.

You will need two of these ribbed rectangles.  If you have made any changes to either the number of stitches cast on or number of rows worked remember to make these changes to the second arm warmer too.
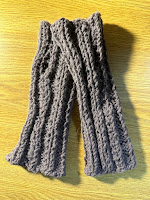


Rectangle to Arm Warmer: I left a long end after I cast off to use for the majority of the yarn used to stitch both sides together.  It can be up to you how you sew the sides together, I just used a whip stitch, nothing special.  The picture below on the left is after my knit ribbed rectangle is cast off.  In the middle is a picture of my arm warmer after it is stitched (you can see the thumb hole that I did not stitch together), but before the ends were tucked in and cut, it is inside out.  On the right is my pair of finished arm warmers (stitched up, the ends tucked in, cut off, and turned right side out).


Wednesday, February 8, 2023

Super Simple Crochet Arm Warmers

This is a super simple crochet pattern to turn a rectangle into some nice arm warmers.

A great project for crochet beginners or a crocheter looking to start making wearable projects.  It just uses a few basic crochet stitches.

Similar to the super simple knit scarf this is a pattern that could be used with almost any yarn and a crochet hook to match.  The only thing that would need to be changed is the number of chains made in the foundation row.  Although this is something that could be altered quite easily by measuring from your knuckles and up your forearm until you reach your desired length.  Then, the rest of the pattern can be followed as is written below.

This is also a pattern that could use a different stitch to make the rectangle, such as a single or double crochet.  This would affect the number of total rows, but again this is something that could easily be altered, even by a beginner, by just measuring the rectangle around your wrist until it fits around comfortably.  The pattern could then be followed as written and just ignore the row count if you choose to change the stitch that you use.

For this pattern I used the yarn Dream in a gorgeous shade of dark mauve.


Materials

  • 4.5 mm crochet hook
  • Medium weight 4 yarn (approx. 100m)
  • Yarn needle
  • Scissors


Stitches Used

  • Chain (Ch)
  • Half Double Crochet (HDC)
  • Slip Stitch (SS)

Instructions

First and foremost since it will be used later on in the project be sure to leave a beginning tail that is at least 6 inches long.

Foundation Chain: To begin I made a chain of 40 because it was the length from my knuckles to about 1/2 or 3/4 up my forearm (although this chain could be made as long or as short as you want them to be.  To the right is an image of my foundation chain with the longer beginning tail which can be seen at the bottom.


Row 1: In the 3rd chain from the hook I made a HDC and then HDC in each chain until I got to the end of the row.  In total 38 HDC.  To the left is a picture after row 1.


Row 2: Ch 2 and turn your work.  Then put a HDC in the back loop only of each and every stitch down the row until you get to the final stitch in which you will put a regular HDC through both loops, so you keep your total of 38 HDC.  Crocheting in the back loop only is something that sounds more complicated when it is.  When looking at each stitch you will see the top of it has formed a sort of "v" shape on its side, you will just go through the loop that is farther away from you (the back loop) instead of both loops that form the "v".  The back loop is used because it gives this nice ribbed texture to our arm warmers as well as giving them a little bit of stretch to allow them to slip easily onto each arm.


Repeat row 2 for a total of 16 rows or until the resulting rectangle can be wrapped around your wrist comfortably.  The picture below is of my finished rectangle.
Then, Ch 1, turn your work and fold the rectangle in half.  Then, make SS connecting the two sides until you reach where you want your thumb hole to open (for me this was 25 SS, I left 7 stitches for the thumb hole).  At this point, you can tie off this end.  This will be the section that is closer to your elbow.

Returning to the longer tail from the beginning of the project, this should be on the opposite end and is closer to your knuckles.  Thread the tail through your yarn needle.   Then, you want to sew the two sides together.  I just used a whip stitch, the stitch that you used is not of great importance.  I sewed 6 stitches together on this side.  Then, make a knot and tuck in both ends using your yarn needle, cutting off any excess.
In the pictures below the one on the left is after it is seamed together, but before the ends are tucked in.  On the right is still inside out, but after the ends are tucked in.  In both pictures you can see the thumb hole if you look carefully.

Turn right side out and you have an arm warmer.  Repeat the pattern in order to have a pair of arm warmers.  Below is a picture of my right side out finished pair of arm warmers.  For being such a simple project they turned out a beautiful product.


Thursday, January 26, 2023

Super Simple Knit Scarf

    I am well aware, that this is not a perfect knitted scarf.

    I am quite happy with it and think that when it is being worn all of the little imperfections will become less noticeable.

I wanted to make this scarf to keep my neck warm, I hoped this scarf would come out looking nice, but I did not want it to be a decorative scarf, I wanted this to first and foremost be functional.

    I used two balls of Frog Tree yarn, approximately 105 yards in each ball. It is a light green color (although the picture does not show the color accurately). Being made of 70% merino wool and 30% bamboo, which should make it both warm and soft, perfect for a scarf.

I made this scarf on size 10 or 6mm knitting needles. I chose these because they are the smallest pair of straight knitting needles that I have and I wanted to try and maximize the warmth of this scarf by giving it as tight a weave as possible without causing it to take an eternity to make. This could have happened if I were to use needles that were much thinner for my scarf, I wanted to be able to use this scarf before winter was over. For this project I cast on 25 stitches, because I figured that would be a good height for my scarf as it is enough to cover both my nose and chin which is my personal preference for scarf coverage. If a scarf is too thin then it does not do an adequate job of being a scarf, and if it is too thick then it becomes too bulky and difficult to tie and tuck into a jacket. To keep this as simple and mindless a project as possible I have been just using a plain knit stitch for all of it, otherwise called the garter stitch, that I just repeated row after row until I felt that the scarf was long enough.

    You could use any yarn, needle size, or scarf height that you want, this is all just done to my preference and materials at hand.  Although when picking yarn for a scarf I would recommend making sure that it is soft and maybe rub it against your neck to make sure that it is not scratchy on the more delicate skin there, just because it feels soft to the touch of your fingers does not mean that it will feel as soft against your neck.