If crochet is not your thing and you still want warm arms, here is my pattern for knit arm warmers.

Materials
- Size 10 or 6mm knitting needles
- Medium weight 4 yarn (approx. 75m)
- Scissors
- Yarn needle
Other Information
The yarn that I used for this project was the same as that of my Super Simple Crochet Arm Warmers. It is called Dream and I chose a beautiful dark mauve shade.
The number that I casted on was determined by the circumference of my wrist. My crochet version of arm warmers was worked lengthwise to then fit around the wrist. Whereas for this knit version I was working with the circumference of my wrist to then reach length after enough rows were completed.
The size/weight of yarn that you choose is not very important. However, this will affect the size of knitting needles that you choose, the number you cast on, and how many rows you knit. If you choose a thinner yarn you will most likely use smaller needles and need to cast on more stitches along with having to knit more rows overall. The opposite would happen for each if you use thicker yarn.
To be entirely honest you may have to work enough rows to be able to tell whether or not this will fit around your wrist. In which case you would have to start over if it is too small or too big. Remember that this pattern will make the arm warmers stretch quite a bit.
Instructions
Cast on: Make sure that you leave enough of a tail to stitch the part of the arm warmers from your knuckles to where you want your thumb hole to begin. Then cast 28 stitches onto your knitting needles. The weight of yarn or needle size does not matter as long as they are compatible. I used a weight 4 yarn and size 10 or 6mm knitting needles.
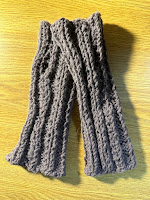
 To keep following the pattern make sure that it is in a multiple of 4. I also used a really stretchy stitch so you would probably be more worried about the arm warmer being too big rather than too small. You can see how stretchy this stitch is in the picture below. At the top of the rectangle you can see how narrow the rectangle seems before it is stretched and at the bottom of the picture you can see how stretchy it is.
All rows: A 2x2 ribbing, which means 2 knit stitches then 2 purl stitches. Repeat this for the entirety of the row.
Since this arm warmer was knit flat to achieve the ribbed look, you have to alternate what stitch is knit. For the stitches that you knit in the previous row you will purl them, and those that you purled you will not knit those stitches. If you followed my suggestion above and cast on a multiple of 4 you do not need to think about what stitch you made in the previous row. Instead you will just start with 2 knit stitches for each row.
 I repeated this rib stitch for a total of 43 rows. This can really be for as many rows as you need to go from your knuckles until your desired length for the arm warmers is achieved.
Once you have reached your desired length you will cast off. The way that you cast off is not important to the result of the arm warmer.
You will need two of these ribbed rectangles. If you have made any changes to either the number of stitches cast on or number of rows worked remember to make these changes to the second arm warmer too.


No comments:
Post a Comment